Tampilkan postingan dengan label Widget. Tampilkan semua postingan

Vkontakte Recommendation Widget for Website and Blog

Vkontake is a popular Russian based social network which now has millions of registered users. They offer several plugins for websites and blogs. In my previous posts, I have rendered few of popular Vkontakte widgets and explained you how to add them on your site. This time I will show you how to add Vkontakte recommendation widget on your website or blogger blog.

Like
You should add VK like button in order to decide which
posts to be placed in sequence
Image credit: Freedigitalphotos.net
A few months ago, I wrote some posts about some recommendation widgets for blogger. Actually they can be added to your website and WordPress blog too. Here are some tutorials which will give you great indication how your readers are loving to your posts.

Add Facebook Recent Activity Feed plugin
Install Facebook Recommendation Plugin

Other Vkontakte Widgets,


Now let’s see how to create a Vkontakte Recommendation widget.

Create Vkontakte Recommendation widget


First of all you should have created a Vkontakte application for your website/blog. So if you have created a Vk app for your site,please omit these steps and follow up form next phase.

Create Vkontakte Web Application


1: Sign up on Vkontakte from this link. Once you have created your account, Go to this page so that creating your new application.
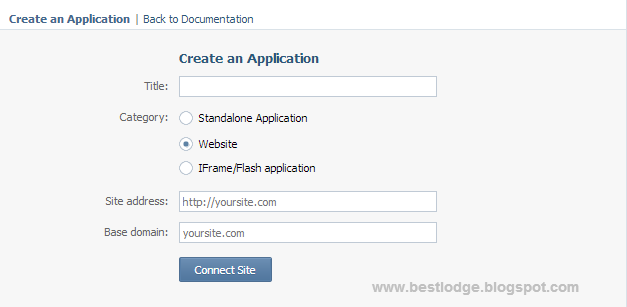
Create-An-Application


2: Now Type the title of your first VK application. (E.g: Your website Title)

3: Choose the second option (Website) from the category list. If you selected a different option, you cannot use the app for embedding Vkontakte plugins.

4: In site address field, type the URL of your Website or blog in that you’re going to embed VKontakte plugins.It can be a sub-domain name( E.g : http://www.problogtricks.com , http://demo.problogtricks.com ). So make sure you have entered your site’s address correctly.Above  two addresses are varying from each other.

5: In “Base domain” field,type your website’s base domain name.( E.g: problogtricks.com )

Generate Vkontakte Recommendation Widget code


Now we have to do is getting our recommendation widget code. So Visit this page and create your Recommendation widget.

Widget_code


  1. Select your Application title that you created a few minutes ago from the site/application drop down menu.
  2. Set the Numbers of posts that is displayed on the recommendation box. You can set it to 3,5 or 10 posts.
  3. In Selection Period field, you can choose what’s the time period that widget covers the posts which are popular. E.G: Day,Week,Month
  4. From last drop down menu you can set the wording either like this or find this interesting.

Now you’re done. Select the Embedding code and paste it on your website/blog where recommendation widget appears.

Add Vkontakte Recommendation Widget To Blogger


1: Sign in to your Blogger Account.
2: Go to Layout >> Add >> HTML/JavaScript.
3: Paste the "Embedding code".
4: Save your HTML/JavaScript.

Add Vkontakte Recommendation Widget To WordPress


1: Log in to your WordPress Dashboard.
2: Go to WP-Admin panel >> Appearance >> Widgets.
3: Drop a Text widget to side bar and paste the "Embedding code".
4: Save your Text widget.

Say what you want...


Vkontakte Recommendation Widget is a perfect way to boost mostly Russian people to your website/blog. As a webmaster we want every people join to our blog community. Social networks have been proven that webmasters can't grow up without making uses of them. So here in this time friends,i explained you how to add Vkontakte Recommendation widget on your site easily. Please be sure that before adding Vkontakte recommendation widget,you'd have added Vkontakte like button to display recommend posts properly.

If you need any help, Ask me anything via commenting below.I will reply to all of your queries as time allows me.

Would you like this tutorial ? So take a few seconds to share this tutorial among your friends on Facebook,Google plus, Twitter, LinkedIn and Vkontakte.


How to Add Vkontakte Like Button

Vkontakte is a popular social network, especially among Russian language speaking people. Nowadays they’re making new changes and introducing new widgets for webmasters. Already I have rendered you several Vkontakte plugins for both websites and Blogs like Vkontakte comment formPoll widgetshare buttons etc.

Like
This time I will show you how to add Vkontakte Like button. As we all know, different social networks afford different types of like buttons ( E.g: Facebook like button, Google plus one button). Vkontakte like button or Vk like button is another different and an attractive button. If you want to boost traffic mostly from Russia to your websites, this button can make this duty.If you look at Vkontakte like button well, you might see it works differently than other Like buttons.When hover on like button icon, faces of people who liked will be pop out.


Create a Vkontakte application


First you must have created Vkontakte application for your site(s) that you want to add VK like buttons. If you have made an Application, please omit these steps and follow from next steps.

Don’t worry. It just takes five minutes to create an application.

1: Do you have a registered Vkontakte account ? If you have, sign in to your Vk account. If your answer is “no”, So make a FREE Vk account from using this link.
2: Now visit this page so that making a web Application.
3: Create your application simply using below instructions.


Create an Application Vkontakte

  • Type your Application’s title in the  first field. (E.g: My First Application)
  • Choose Website option from the “Category”.
  • Type  URL of your website or blog with http://  in the “Site address” field. ( E.g: http://www.problogtricks.com)
  • In “Base domain” field, type your site address without the http:// ( E.g: www.problogtricks.com)
  • Click on “Connect Site” button and verify application using your SIM card.

Make sure you have saved the Application ID and other details in your computer.

Vkontakte Like Button Types


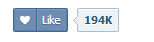
Button with text counter

Button with text counter


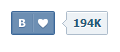
Button with mini counter

Button with mini counter


Mini button

Mini button


Mini button with counter at the top

Mini button with counter at the top


Generate Vkontakte Like button Codes


You can customize Vkontakte like button(Button Height,  Button Name ) using  Vkontakte  Like button code generation tool.

1: Go to like button code generator tool in Vkontakte Development website.
2: Then choose the suitable web application. Select desired button style and copy the Embedding code.Paste the code where Vkontakte like button appears.

Vkontakte Like button Codes
Click Image to Enlarge


Add Vkontakte Like button on Blogger 


Like adding Vkontakte share links,you can add Like buttons on both post & static pages and Sidebar. Now i will explain you how to add Vkontakte like buttons in Layout sections.

1: Sign in to your blogger account.
2: Now go to Layout >> Add a Gadget.
3: Select on "HTML/JavaScript" page element and paste the button code on it.
4: Last save your "HTML/JavaScript"

Add Vkontakte Like button on WordPress


1: Go to your WordPress Dashboard or log in to WordPress account.
2: Select on Appearance tab and click on Widgets.
3: Now drop a Text widget to the sidebar where like button appears.
4: Paste the copied code in the text editor and then Save it.


Need help...?


This tutorial explained you how to add Vkontakte like button on website and blog.I think that it's clear to understand about generating codes and embedding buttons on your site.If you have any question still, just type down it in below. Also i would like to know that should Vkontakte like button be included in the foremost button-set with Facebook,Google plus ...etc.If you have any idea about it, share it with us. Have a nice day!

How to make Poll widget using Vkontakte Application


Why I should use Poll widget?


Nowadays Poll widgets are regularly used for review some aspects such as Popularity of a website, product or reasons for some affairs like “Why do you use smart phones than normal mobile phones?” …etc. Although some webmasters and bloggers do not care about this valuable technique. People can share their responses for each topic though poll widgets. Some times poll widget offers some expedient post topics for you. So Poll widget is one way to test your readers to know what they’re thinking about and what you should give them.

Also if you asked crucial topic from your readers, they will definitely come again to check what the result for current poll is. If that question was very competitive, you can ask another relevant question from them. It will make your blog more user friendly and trendy site. Therefore Alexa rank and number of daily unique visitors of Google Analytics page will increase within few days.

Demo:::


How to make Poll widget Using Vkontakte Apps


You’re free to make and embed any third party poll gadget on your website or blog. Nevertheless Vkontakte provides some scripts for your own Poll widget which you can customize. People who voted can share topic (question) with their choice among their friends. So extra method to boost traffic through Poll :p

You can embed Vkontakte poll widget on your site simply, but you should have to do some works, especially if you’re not a VK member yet. So let’s study how to make Poll widget easily for your website/blog.


Create a Vkontakte application


If you have created Vk application for your website, please omit these steps and follow up from next phase.

Step 1: First of all you have to create a Vk account. Yes... It’s free to create an account. So go to Vk.com website and sign up there. Once you have created your VK account, sign in to your account from here.
Step 2: Go to this page for creating new Application.

Create-Vkontakte-application


Type your new application’s name in the title field. You can type any text you want, but make sure you can remember it for your website or blog. Because one application can’t be used on multiple sites.
Select “Website” as the category. It allows you to display VK plugins on your website.
Like in image above, type your site’s URL address which you’re going to embed poll widget with http:// on the “Site address” field. Then type URL without http:// in “Base domain” field.
Finally click on “Connect Site” button.
Confirm your new application by providing confirmation code which they send to your mobile phone.
Now for security and further practice, save Application ID on your computer.

Get Complete Guide for Creating Vk Application.

Create Vkontakte Poll Widget


Step 1: Go to this page in order to customize your Poll widget.

Create-Vkontakte-Poll-Widget


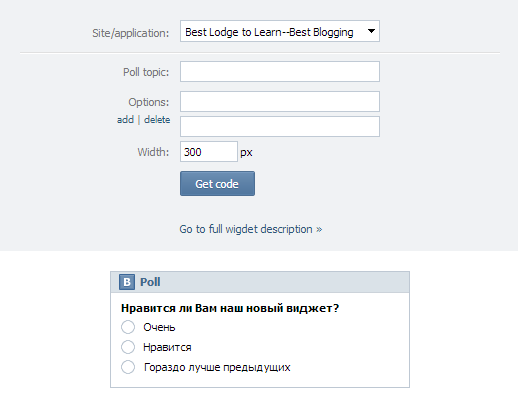
Step 2: Choose your application name from drop down list under “site/application”. Then make below changes,

  • Poll topic : - define the question that you want to ask from your readers.
  • Options   : -  Add your each answer for particular question. Click on ‘add’ link to add more answers. Also click on ‘delete’ button to delete each answers you don’t want.
  • Width      : -  Set the width of poll widget where you place the plugin. If you want to get know much long your blog’s side bar or content is, check out below tutorials. 
                             How to Adjust sidebar width from simple few steps


Step 3: Last click on “Get code” button and copy your poll widget’s code. I recommend you to save the copied data(code and Poll Identifier) on your computer.


Install Vkontakte Poll widget in Blogger


Now you’re almost done. You just need to add poll widget’s code where it appears on your site.
You can add Vkontakte poll widget on your blogger blog. To add widget on your blog’s sidebar,

1: Sign in to your Blogger account.
2: Go to Dashboard >> Layout >> Add a Gadget.
3: Select on “HTML/JavaScript “page element and paste code on it.
4: Save your HTML/JavaScript and you’re done.

Enjoy with your readers!

Attractive Cloud Label Widget for Blogger

attractive-cloud-label-widget-for-blogger
We can change our blog performances as we want like changing blogger template, customizing label widget, modifying blog content width etc.  Although some bloggers do not care about blog design & its user friendliness. We all like to maintain our blog beautifully, also readers would like to visit an attractive site, if they didn't meet such sites, and they will definitely close the window directly. After few weeks ago I rendered you attractive CSS cloud label style for your blog. This time after learning new things, I coded new cloud label style and added it to my blog.It looked like good. So i thought to present  this cloud label style to my readers.


What are new features on this Cloud label style?


You might meet some new items on this cloud label style, if you used it. Some of them are listed in below.

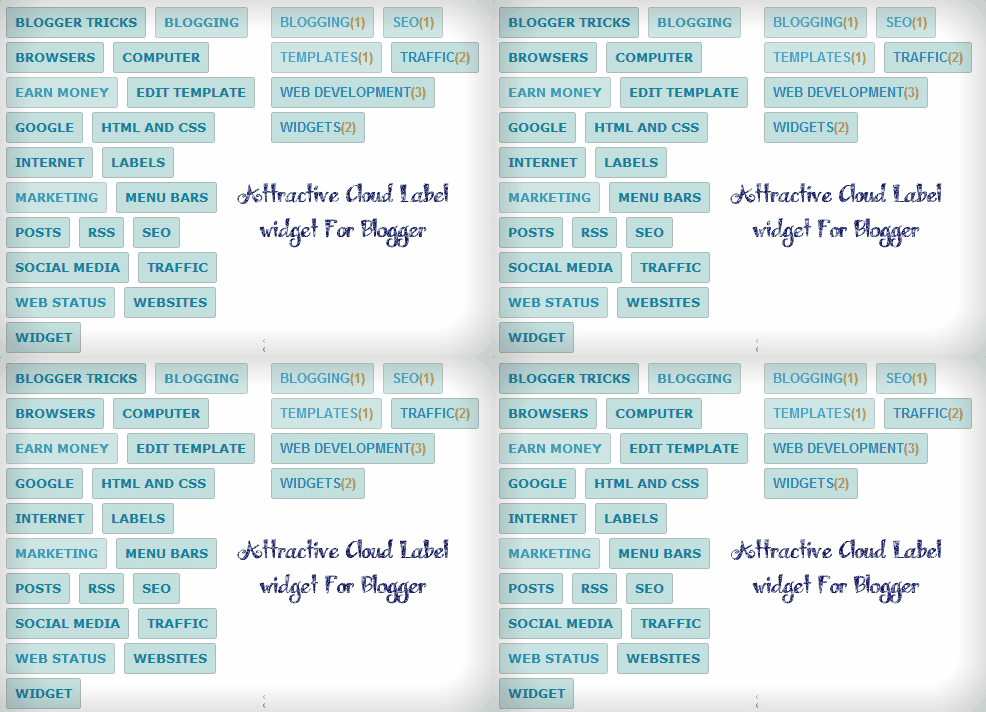
I. Define different colors for label name and label post counter( see image )
II. When mouse over on label name, it changes its preferences and on mouse out, it revert itself. But post counter does not render any hovering effect, because it is not a hyperlink.
III. Next and my best feature is, it does not change its background color and approach to an ugly design. When any person find posts under a special label, lets tell it is ‘Widgets’, he/she will see the visited link (Widget label link) in another design.

Demo: - Look below stylish cloud label style. You can see how it will appear with post counter and without.

Stylish-cloud-label-style-with-post-counter-and-without-it


How is works?

Each label link is nested in a class name called “label-size”. If font-size, link color, hovering effects are not specified, they will change to default post styles. So defining each class name in label gadget, we can make a beautiful cloud label style.

Install cloud Label Widget on Blogger


First of all you have to install cloud label style on your blogger blog, if you have done, make sure you convert block labels into cloud label style.

Step 1: Sign in to your Blogger account.
Step 2: Go to Dashboard >> Layout >> Add a Gadget.

Add-a-Gadget-link


Step 3: Now click on “Labels” page element from pop up window.

Labels-page-element


Step 4: Then turn display style to “Cloud” as shown below. Please select as most 25-30 labels(Selected Labels). If blogger let you to add 2000 labels to a blog, you can’t display such amount of label links on your blog. Too many labels on your blog will look awkward.

Configure-Labels-Cloud-Label-display-mode


Step 5: Save your “Labels” page element.

Integrate new cloud Label style to Blogger


Now you just need to do is pasting some piece of CSS code to your template. Let’s see how to do it.

Step 1: Go to ‘Template’ and backup your template.
Step 2: Now click on ‘Edit HTML’ button and find below code in your template.

]]></b:skin>

Step 3: Just above of ]]></b:skin> code, paste below piece of code directly.


.label-size {
margin:2px 6px 2px 3px;
padding:7px 8px;
text-decoration:none;
text-transform:uppercase;
float:left;
border:1px solid #AEBABA;
-moz-border-radius:2px;
-webkit-border-radius:2px;
border-radius:2px;
font-weight:bold;
font-style:normal;
color:#B7831B;
background:rgba(180,215,214,0.80);
font-size:13px;
}
.label-size:hover {
border:1px dotted #AEBABA;
-moz-box-shadow:inset 0 0 2px 2px rgba(189,225,224,0.35);
-webkit-box-shadow:inset 0 0 2px 2px rgba(189,225,224,0.35);
box-shadow:inset 0 0 2px 2px rgba(189,225,224,0.35);
text-decoration:underline;
-moz-transition:all 1000ms linear 150ms;
-webkit-transition:all 1000ms linear 150ms;
-ms-transition:all 1000ms linear 150ms;
-o-transition:all 1000ms linear 150ms;
transition:all 1000ms linear 150ms;
}
.label-size a {
text-decoration:none;
float:left;
text-transform:uppercase;
-moz-transition:all 1750ms ease-out 15ms;
-webkit-transition:all 1750ms ease-out 15ms;
-o-transition:all 1750ms ease-out 15ms;
-ms-transition:all 1750ms ease-out 15ms;
transition:all 1750ms ease-out 15ms;
}
.label-size a:hover {
color:#FCC442;
text-decoration:underline;
-moz-transition:color 1s ease,text-decoration 1.5s cubic-beizer;
-webkit-transition:color 1s ease,text-decoration 1.5s cubic-beizer;
-o-transition:color 1s ease,text-decoration 1.5s cubic-beizer;
-ms-transition:color 1s ease,text-decoration 1.5s cubic-beizer;
transition:color 1s ease,text-decoration 1.5s cubic-beizer;
}


  • Change 13px with font size that suit for your template.
  • Replace 7px 8px with your lengths which specify the height and width of label link box.


Step 4:  Last Save your Template.

You’re done. Now view your template and see how label widget is hanging in your blog beautifully.


Need help…?

Friends, I present this tutorial as simple as you can understand. If you meet any error or can’t understand how to implement this cloud label style, just leave a comment in below.

Customize nRelate Related Posts Widget with CSS For Blogger

Customize nRelate Related Posts Widget with CSS For Blogger

Related Posts widgets are such an important plugin that every blog must have.Why i say it,to survive in Blogosphere and increase several aspects such as average time landing on a web page,page views per visitor and importantly Alexa rank,You should engage your readers to read related posts.Since starting a blog,you have to do many works till receiving some revenue to your pocket,even after that. In this case Related Posts widgets take a major place in your site as an assistant who introduces new relative posts to users. There are many third party sites out who present different types of Related posts widgets. nRelate recent posts widget is a great plugin with fully control to its users.You can customize its CSS codes and make attractive related posts widget for your site.

nRelate-Related-Posts-widget
Customized nRelate Related Posts widget for Blogger:
Click on Image to Enlarge

Already i have explained you what is nRelate related posts widget and how to Install nRelate Related posts widget in blogger easily.If you didn't read that tutorial,i recommend you to check it out.It will be helpful to you to know some special features on nRelate related posts plugin and how to conflate them with your site . Now you know we can customize nrelate related posts plugin using CSS. But how to do it on Blogger ? It's an easy work,just like you add stylish cloud label gadget to blog,You need to add piece of CSS code to your template.Styling nrelate widget is quite easy task if you find out how to do it. Some people think that it's hard to style blogger widgets,But it is not true.I too thought it in first days when i came to Blogosphere. But after researching its source code and playing with them,i understood that it's not a hard work. Like creating navigation menu bars using CSS ,you need to use some unique CSS ids and class names of nRelate plugin to style related posts plugin. Look at above image,i have customized nRelate plugin with CSS. You can see it comparing two images. Now i will show you how to add this effect on your blog's nRelate related post widget.


Customized Related Posts Widget For Blogger


Step 1: Sign in to your Blogger account
Step 2: Go to Dashboard >> Template >> Edit HTML.
Step 3: Now Find below code in your template.

</head>

Step 4: Next just above/before </head> code,paste below one directly.

<style type="text/css">
/* ------Customized nRelate Related Post Widget CSS Codes------ */
.nr_post_title { color:#39AFEA !important !important;font-size:13px !important;font-family:'Lucida Sans Unicode','Lucida Grande','Lucida Sans','DejaVu Sans Condensed',sans-serif !important;}
.nr_post_title:hover { color:#EAB515 !important;}
.nr_title {font-family:Cambria,'Times New Roman','Nimbus Roman No9 L','Freeserif',Times,serif !important;font-size:20px !important;color:#D66A22 !important;}
.nr_title:hover { color:#22D633 !important;}
.nr_img  { border-radius:none!important; }
.nr_panel:hover .nr_img {outline:1px solid #3952C0 !important;-moz-border-radius:30px;-webkit-border-radius:30px;border-radius:30px;-moz-transition:all .1s ease;
-webkit-transition:all .1s ease;-o-transition:all .1s ease;transition:all .1s ease;}
/* ------End CSS code------- */
</style>

  • #D66A22    :-Replace with you desired color name/hexadecimal number.It specify the color of nRelate title,by default the title text is "You might Like Also :-".Here i have changed it to my own text( Don't Miss :- ).
  • #22D633     :-Change the color number with your color that will be shown when nRelate title is hovered.
  • #39AFEA    :-Define the color of post title.
  • #EAB515    :-Post color when it is hovered.
  • #3952C0     :-Outline color of image when mouse over.


Step 5: Now click on Save Template button.


That's all.Now refresh your blog and see how nRelate related posts widget is appearing on your blog.If you have any question,feel free to ask me anything in below commenting section.Happy blogging pals :)
10+ Free Flash Analog Clock Widgets

10+ Free Flash Analog Clock Widgets

Free-Analog-Clocks
There is a valuable quote called "Time is the Gold".You can decorate your blog or web site by hanging a beautiful world clock widget.Then everyone can check out what is the time now in their location easily.Before two months, i rendered you some resources to get Free world clock to your site.Today i found some awesome flash analog clocks,which are presented by 100widgets free.So i thought why i don't introduce them for my readers.Now i will present 10+ beautiful flash clock widgets.You can add any amount of below cool flash analog clocks to your website or blog.If you want to add it on your blogger blog's sidebar,you might use HTML/JavaScript page element for it.Now lets see what're the flash analog clocks without wasting more time.


Beautiful clock


You can see below clock is really attractive clock widget.To some it will remind about first love, and someone about St. Valentine’s day.


<script type="text/javascript" src="http://100widgets.com/js_data.php?id=161"></script>

Smile clock


Your smile clock near bed is now in Computer !The colors of this widget match for any type of template either dark or white.


<script type="text/javascript" src="http://100widgets.com/js_data.php?id=107"></script>

 Old clock


This Old clock has a very attractive design which reminds us about the past before making digital clocks. It can add something interesting and unexpected to the interior of your desktop.


<script type="text/javascript" src="http://100widgets.com/js_data.php?id=108"></script>

Grey roundtable Clock


This grey color modern clock widget is very appropriate for your white color template site.If you're searching for simple clock without dozens of colors,so here is for you...


<script type="text/javascript" src="http://100widgets.com/js_data.php?id=112"></script>

 Js clock


Here is an another fantastic analog clock widget.This widget is already bundled with JavaScript SWFObject library.It show moving elements with various colors in every second.Installing this clock gadget in your site,It will definitely attract your visitors like you :p


<script type="text/javascript" src="http://100widgets.com/js_data.php?id=81"></script>

 Lovely Flower clock


Look at below flower clock little bit time.You see it revert its background row of daisies.You can amaze your visitors by adding below clock widget on your site.


<script type="text/javascript" src="http://100widgets.com/js_data.php?id=82"></script>

 Clock black and red


Large Arabic digits are easy to recognize as well as the clock hands. inside the large clock a smaller one is situated that makes the overall composition more esthetically attractive and up-to-date. This is perfect choice for your website.


<script type="text/javascript" src="http://100widgets.com/js_data.php?id=47"></script>

 Classical Clock


Do you want to display a simple,but curious classical clock on your blogger site?This charm clock widget could be appropriate for it.


<script type="text/javascript" src="http://100widgets.com/js_data.php?id=48"></script>

 Round clock


Looks like your wall clock ?Yeah..might be.People who are practiced for their local clock will surely like this.Black iframe with white background along with red minute hand blazon its simple design.


<script type="text/javascript" src="http://100widgets.com/js_data.php?id=37"></script>

Light-blue and black color Clock


This is another nice and pleasant analog clock widget that your website decorate.The widget is placed on soft light background, which gives a clear contrast between them. Arrows are wide and make it easy to understand what time is now.Also digital clock inside of analog clock shows the time.It is helpful for who can't see the time well.


<script type="text/javascript" src="http://100widgets.com/js_data.php?id=39"></script>

Diesel green clock


Look at diesel green clock.It looks like very stylish and luxurious with deep green,black and white colors.The fans who like to a new thing will most like this.It is easy to attract you and visitors to your blog.


<script type="text/javascript" src="http://100widgets.com/js_data.php?id=30"></script>

 Watch the pendulum


I really like this clock with pendulum.It is an eye-catchy flash clock widget that is most popular in these days.If you get bored sometimes look at this clock but beware, don't get hypnotized by it's moving pendulum!


<script type="text/javascript" src="http://100widgets.com/js_data.php?id=34"></script>

So friends,I would like to ask your responses about this Flash clock widget collection.Stay blessed!

How to Remove Post counter In Blog Archive Gadget

Blog archive gadget is an unique widget which display the history of blog,post titles and number of blog posts that are published in each month,week or day.Blog archive gadget is one which increase your site's link juice and number of page views.Readers can find some specific posts using Blog Archive widget without searching keywords on custom search box.You might added Blog archive widget to your site.If you didn't add that yet, to add Blog archive widget follow below steps.

1: Sign in to your Blogger account.
2: Go to Dashboard >> Layout >> Add a Gadget.
3: Find "Blog Archive" gadget on page element pop up window.
4: You have some option to customize Blog archive widget.Configure Blog archive widget as you like and save it.
5: You're done.

Blog-Archive-with-Post-count

You can visit your blog and see its performances.You will see that Blog archive gadget includes Post counter nearby date.If you think it doesn't befit for your blog,you can remove post count in blog archive gadget.Remember after removing post count from Blog archive,users can't find how many posts are published in each day,month or year.


Remove Post count In Blog Archive


Step 1: Go to Dashboard >> Template.
Step 2: Now Backup your template.In case you got something wrong ,downloaded template will help to install current template again.
Step 3: Click on Edit HTML button and click on "Jump to Widget" button.Then select on "BlogArchive1" option from drop down menu.You will see chunk of code similar to one below.

<b:widget id='BlogArchive1' locked='false' title='Archive' type='BlogArchive'>
    <b:includable id='main'>
  <b:if cond='data:title'>
    <h2><data:title/></h2>
  </b:if>
  <div class='widget-content'>
  <div id='ArchiveList'>
  <div expr:id='data:widget.instanceId + &quot;_ArchiveList&quot;'>
    <b:if cond='data:style == &quot;HIERARCHY&quot;'>
     <b:include data='data' name='interval'/>
    </b:if>
    <b:if cond='data:style == &quot;FLAT&quot;'>
      <b:include data='data' name='flat'/>
    </b:if>
    <b:if cond='data:style == &quot;MENU&quot;'>
      <b:include data='data' name='menu'/>
    </b:if>
  </div>
  </div>
  <b:include name='quickedit'/>
  </div>
</b:includable>
    <b:includable id='flat' var='data'>
  <ul class='flat'>
    <b:loop values='data:data' var='i'>
      <li class='archivedate'>
        <a expr:href='data:i.url'><data:i.name/></a> (<data:i.post-count/>)
      </li>
    </b:loop>
  </ul>
</b:includable>
    <b:includable id='interval' var='intervalData'>
  <b:loop values='data:intervalData' var='i'>
      <ul class='hierarchy'>
        <li expr:class='&quot;archivedate &quot; + data:i.expclass'>
          <b:include data='i' name='toggle'/>
          <a class='post-count-link' expr:href='data:i.url'><data:i.name/></a>
            <span class='post-count' dir='ltr'>(<data:i.post-count/>)</span>
          <b:if cond='data:i.data'>
            <b:include data='i.data' name='interval'/>
          </b:if>
          <b:if cond='data:i.posts'>
            <b:include data='i.posts' name='posts'/>
          </b:if>
        </li>
      </ul>
  </b:loop>
</b:includable>
    <b:includable id='menu' var='data'>
  <select expr:id='data:widget.instanceId + &quot;_ArchiveMenu&quot;'>
    <option value=''><data:title/></option>
    <b:loop values='data:data' var='i'>
      <option expr:value='data:i.url'><data:i.name/> (<data:i.post-count/>)</option>
    </b:loop>
  </select>
</b:includable>
    <b:includable id='posts' var='posts'>
  <ul class='posts'>
    <b:loop values='data:posts' var='i'>
      <li><a expr:href='data:i.url'><data:i.title/></a></li>
    </b:loop>
  </ul>
</b:includable>
    <b:includable id='toggle' var='interval'>
  <b:if cond='data:interval.toggleId'>
  <b:if cond='data:interval.expclass == &quot;expanded&quot;'>
    <a class='toggle' href='javascript:void(0)'>
      <span class='zippy toggle-open'>&#9660;&#160;</span>
    </a>
  <b:else/>
    <a class='toggle' href='javascript:void(0)'>
      <span class='zippy'>
        <b:if cond='data:blog.languageDirection == &quot;rtl&quot;'>
          &#9668;&#160;
        <b:else/>
          &#9658;&#160;
        </b:if>
      </span>
    </a>
  </b:if>
 </b:if>
</b:includable>
  </b:widget>

Step 4: Now remove below red color piece of code from above code.

(<data:i.post-count/>)
Step 5: Save your template.

You're done.View your blog again to see the Blog Archive gadget.You should see that post counter is not there.

How to Add Bing Translate Gadget to My site

Translation
Since some time Internet is a part of life in most people.They use Internet for various purposes such as getting news,knowledge,connect with relatives friends,make money online,host their valuable information in Internet,shopping  ...etc.Some people don't know some languages,also web publishers make their websites using their custom languages.i.e: Spanish blogs,Chinese websites like baidu.com and qq.com. These sites are very popular among the visitors who understand those languages that website created.


As a webmaster or blogger who like to make their site more popular among various people in the world who speak different languages,must include a Translation gadget in their site.I think it is a most dominant gadget that every site should have.About few months ago i talked with you,what is Google translation gadget and how to add it on your site easily.There is another tool to translate any web page to more than 42 languages.Microsoft has introduced new translation widget for webmasters.It is beautiful small gadget(Look at below ).The process of Bing translator is very simple.If you wants to translate web page into your language,you may click on translate button.Then small gadget will be opened and you will click on your language link. Then whole page will be translated to chosen language within few seconds.You can see what languages are supported by Bing translator.


Add Bing Translate Gadget to Blogger


1: Sign in to your Blogger account.
2: Go to Dashboard >> Layout and click on "Add  a Gadget" link.
3: Select on "HTML/JavaScript" page element.
4: Paste below code on it.

<div id='MicrosoftTranslatorWidget' class='Dark' style='color:white;background-color:#555555'></div><script type='text/javascript'>setTimeout(function(){{var s=document.createElement('script');s.type='text/javascript';s.charset='UTF-8';s.src=((location && location.href && location.href.indexOf('https') == 0)?'https://ssl.microsofttranslator.com':'http://www.microsofttranslator.com')+'/ajax/v3/WidgetV3.ashx?siteData=ueOIGRSKkd965FeEGM5JtQ**&ctf=True&ui=true&settings=Manual&from=en';var p=document.getElementsByTagName('head')[0]||document.documentElement;p.insertBefore(s,p.firstChild); }},0);</script>

  • Change white with the font color name or its hexadecimal number.
  • Replace your desired background color name or its hexadecimal number instead of  #555555.

5: Now save your HTML/JavaScript.
6: You're done.

If you want to add Bing translation widget into your website,go to dashboard >> edit web page and paste above code between <body> and </body> tags in your website where Bing translator appears.Now save your web page and view your site.You will see Bing translation gadget is appearing on your site.

Conclusion

Translation plug ins are very useful and important to all of websites and blogs to widen its popularity.These days many people surf the Internet by using their mobile phones,computers, tablets and other electronic devices. Some people can't understand the English language.Translation widgets can translate web content into various languages from single click. Bing translator is such a useful gadget for every webmaster and blogger.You can add translator gadget on your site simply by adding piece of code.This tutorial paved the way for adding Bing translator to blogger and website.
If you have any query when adding Bing translation widget to your site,leave a comment below.Happy and peace pal :)

Embed Realplayer With more Controls

Embed-Realplayer
Last time i talked with you, How to Embed Real Player Image Window in Blogger and Website.In that tutorial i explained why you should use a media player on your site and easy ways to embed realplayer image Window on a blogger blog.This time i will show you how to embed a real player with more controls.More controls mean abilities of changing sound & muting,pausing and stopping the play. Absolutely this is quite useful widget for any site. Readers would like this media player.They can play a audio or video anytime they want.More controls they have.


Below is an example of realplayer that i present you.You  can change its height and width easily,but make sure you do not lose some controls by reducing the width & height.


You can paste below code on your site where above Real player appears.After copying and pasting below codes,don't forget to make its changes.


<OBJECT ID=RVOCX CLASSID="clsid:CFCDAA03-8BE4-11cf-B84B-0020AFBBCCFA" WIDTH=300 HEIGHT=30>
<PARAM NAME="CONTROLS" VALUE="StatusBar">
<PARAM NAME="CONSOLE" VALUE="one">
<EMBED SRC="Your-Audio-File-URL.mp3" WIDTH=300 HEIGHT=30 NOJAVA=true CONTROLS=StatusBar CONSOLE=one>
</OBJECT>

  • Replace Your-Audio-File-URL.mp3 with your audio file URL that is hosted in Internet.
  • Adjust the width and height of media player by changing red color numbers.All numbers are certain pixel values.


How to Embed Real Player on Blogger


1: Sign in to your Blogger account.
2: Now go to Dashboard >> Layout >> click on Add a Gadget link in sidebar.
3: Select on "HTML/JavaScript" and paste above code on it.Make sure you have made necessary changes in code.


4: Save your HTML/JavaScript page element.
5: You're done.Enjoy :)

How to Add Show/Hide NavBar Link Gadget to Blogger

How to Add Show/Hide NavBar Link Gadget to Blogger

Blogger has added some gadget and features for blogs.Some of them optional and unnecessary items such as Blogger navbar. Already i have wrote a tutorial about removing blogger navBar. In that tutorial i have explained what is the blogger nav bar and some advantages of it to users and bloggers.Although if there are some usages out, most of bloggers dislike to display navbar on the top of blog or header of blog.Therefore certain bloggers prefer to remove blogger navbar from their blog. Other bloggers would like to hide navbar in blogger.some advantages and features of blogger navBar are listed in below.

  • You can Search and visit other blogger blogs easily.
  • When you click on B icon you can go to blogger home (Blogger.com).
  • There are quick links to Dashboard and sign in/sign out.
  • You can "Flag Blog".
  • You can see recently-updated blogs clicking on "Next Blog".
  • Share blog on Google plus...New feature

If navbar gives several benefits to a blog,as a blogger who like to maintain the blog looks like professional website,you might not intend to display the navbar on the top of window.But you can hide blogger navbar from your blog and display a link to show it when user wants.In this tutorial you will ascertain how to add Hide/Show NavBar link gadget to your blog.I suggest you  to check the demo first,before following below few steps.


1: Sign in to your Blogger account.
2: Go to Dashboard >> Layout and click on "Add a Gadget" link.
3: Select on "HTML/JavaScript" page element from the pop up window.
4: Paste below code on it.

<script type="text/javascript">
var showHeader=false;
function ShowHideNavBar()
{
showHeader=!showHeader;
var nav=document.getElementById("navbar-iframe");
if (showHeader)
{
nav.style.visibility="visible";
nav.style.display="block";
}
else
{
nav.style.visibility="hidden";
nav.style.display="none";
}
}
</script>
<style type="text/css">
#navbar-iframe {
visibility: hidden;
display: none;
}
</style>
<span style="cursor:pointer; font-weight:normal; " onclick="ShowHideNavBar();">
Show/Hide Blogger NavBar
<a style="visibility:hidden;" href="#"></a>
</span>
Replace Purple color text with your desired message.

5: Now Save your "HTML/JavaScript".

That's all.Visit your blog and see the new gadget is appearing on sidebar.
Happy Blogging buddies ;)

Create Rollover image Effect

The Rollover effect is one that swap an image object with another image object when mouse hover on image and revert those images when mouse out from image.Rollover images are preloaded images when loading the web page.This ensure that rollover images loads quickly.

Demo:- Hover on image to see the rollover image effect.


.......................................................................................................................................

Making Rollover Effect Image

.......................................................................................................................................

The onMouseOver and onMouseOut attributes are used for creating rollover image effect.You just need to paste below HTML code where rollover image effect plays.

 <a href="URL ADDRESS"><img src="URL OF THE FIRST IMAGE " onmouseover="this.src='URL OF THE SECOND IMAGE '" onmouseout="this.src='URL OF THE FIRST IMAGE '" /></a>


  • Replace URL ADDRESS with your link address that you want sent user there.
  • Replace orange color text(both texts) with your main image URL which appears before you hover over it and after mouseout.
  • Replace the text with green color with your second image URL that will appear when you hover over it.

Set the Image width and Height of Images


This trick will be useful for you.In some occasions we can't find images with same width and height.When adding rollover image effect to those images,they're chaotic when hovering over them.So we need to set the height and width of both images in one time.We can do this task easily using CSS. Look at below code.

 <a href="URL ADDRESS"><img src="URL OF THE FIRST IMAGE " onmouseover="this.src='URL OF THE SECOND IMAGE '" onmouseout="this.src='URL OF THE FIRST IMAGE '" style="height: 350px !important; width: 350px !important;" /></a>
Replace above 350px with the height and width of your images.

Useful Tut Now:- How to Adjust sidebar width from simple few steps

.....................................................................................................................................

Add Rollover Image Effect to Blogger

.....................................................................................................................................

Now you know how to code for making rollover image effect.So you just need to implement the code on your blog.If you need to add rollover image effect on your blog's sidebar,follow below steps.

  1. Sign in to your Blogger account.
  2. Go to Dashboard >> Layout and click on "Add a Gadget" link.
  3. Select on "HTML/JavaScript" page element from the pop up window and paste above code for rollover image effect.Make sure you have made above customization precisely.
  4. Finally save your "HTML/JavaScript".
  5. You're done.
Also you can add rollover image effect inside your post by going to New post --> Switch to HTML mode and paste the code where rollover effect appears.

That's all.Enjoy :)

How to add vkontakte comment form in Blogger

Vkontakte
Comment forms are usually used by every webmaster and blogger.Comment forms build relationships between authors and readers.Sometimes relationships become a community.With the time consuming if you engage in blogging or updating your site daily basis,local community will be built up.Local readers mainly cause to increase the Alexa rank and other metrics of your site.The foundation or core of building good site with local readers is the Comment forms your site has.


About four months ago i have wrote a tutorial How to add Facebook comment form in website and blogger.Also i have posted a full covered tutorial on "How to install Disqus comment system on your site".Vkontakte is one of top social networks in the world.They provide several unique plugins for websites and blogs such as VK sharing links,VK sharing buttons ..etc.But nowadays their comment box become a prominent widget among bloggers and webmasters.So i thought why i don't give the code of VK comment box to my readers.Today i came here with the source code of Vk comment box.You may be a webmaster or blogger else just a reader.Knowing how to add Vkontakte comment box on any page and how it works is important as an internet user.See below Vkontakte comment box.I think Vkontakte comment box is more powerful than other most of comment forms.It has more features such as media attachments that other popular comment boxes haven't.


Adding Vkontakte comment form to Blogger


Step 1: Sign in to your Blogger account.
Step 2: Go to Dashboard >> Template >> Backup current template.
Step 3: Now click on "Edit HTML" button and hit on "proceed" button.(If necessary)
Step 4: Find below code in your template.

</head>
Step 5: Paste below piece of code just before above code.

<script type="text/javascript" src="//vk.com/js/api/openapi.js?98"></script>
<script type="text/javascript">
  VK.init({apiId: APP_NUMBER, onlyWidgets: true});
</script>
  • Replace APP_NUMBER with your Vkontakte app number.
Useful Tutorial Now:-  How to create a VK Application

Step 6: Now find one of below codes in your template.
<data:post.body/>
or 
<p><data:post.body/></p>
Step 7:  Now paste below code right after one of above code.

<div id="vk_comments"></div>
<script type="text/javascript">
VK.Widgets.Comments("vk_comments", {limit: 10, width: "520", attach: "*"});
</script>


  • 10   :- Number of comments to show. E.g:-5,10,15,20
  • 520 :- Width of comment box.Value count in pixels.use our search box to find out how to know blog's content width.
  • "*"     :-  Specify enable media in comments.If you want to disable the media in comments,replace "*"  with false.

 Look at below example code that i disabled the media attachments and set the number of comments as five.The code is placed just below of <data:post.body/> code.

<data:post.body/>
<div id="vk_comments"></div>
<script type="text/javascript">
VK.Widgets.Comments("vk_comments", {limit: 5, width: "550", attach: false});
</script>

Step 8: Now Save your Template.

You're done.View your blog and see the beautiful Vkontakte comment box appearing below of blog post.


Need Help ?


I'm always here to help you.First read the tutorial and follow them correctly.Still you can not solve your problem,So ask me via commenting below.I will help you as time allows me.

I'd like to hear your ideas about Vkontakte comment box.Comment are welcome.If you like this tutorial, So do share this tutorial among your friends around the world.Happy and peace pals :)

How to Embed Real Player Image Window in Blogger and Website

Real-player-for-Websites-and-Blogs
Few days ago i wrote a post how to embed Windows media player in Blogger.I think you'd like that tutorial.This time i'm going to present another source code of an embeddable player.Real player is a well known media player that can be used in computers,smart phones and other devices.By embedding videos and audios in a media player,users can't feel differences between their using device and your site.You can accommodate your readers to play a video or audio by adding real player on your site.It will soothe your readers and you will received replications of them like increasing Alexa rank.


Like embedded Windows media player,you can set the settings of  media player such as auto starting,height and width of player etc.

You can paste below codes where Real player appears.Don't forget to make below changes in the code,

<object id="media"
classid="clsid:CFCDAA03-8BE4-11cf-B84B-0020AFBBCCFA"
height=300 width=320>
<param name="controls" value="ImageWindow">
<param name="console" value="Clip1">
<param name="autostart" value="true">
<param name="src" value="Your-Video-URL.mp4">
<embed src="Your-Video-URL.mp4" console="Clip1"
controls="ImageWindow" height="300" width="320"
type="audio/x-pn-realaudio-plugin" autostart="true">
</embed>
</object>


  • Replace Your-Video-URL.mp4 with your Audio or Video URL.You need to host your media files in your hosting account or other server.
  • Adjust the height and width of real player by changing the purple color numbers.All values are in Pixels.
  • If you don't need to start the video or audio automatically when web page loads,change true value with false.

How to Embed Real player Image Window in Blogger


1: Sign in to your Blogger account.
2: Go to Dashboard >> Layout and click on "Add a Gadget " link where real player appears.
3: Now select on "HTML/JavaScript" page element from the pop up window.
4: Paste above code of Realplayer and make above modifications.
5: Save your "HTML/JavaScript".
6: You're done.View your blog to see the real player is shining on sidebar. 

Example:- 
( Video or Audio files are not available... )

How to add Feedburner Recent Comments Widget for Blogger

Feedburner
Just about two weeks back,i wrote a post on How to add Feedburner recent Posts widget on Blogger and other blogs.Today we'll learn how to create Recent comments widget offered by feedburner. This tutorial is also similar to recent posts widget offered by feedburner. If feedburner recent comments widget is based on JavaScript,it loads quickly,because JavaScript codes stored at feedburner servers.Your site doesn't' get more time to load JavaScript. If you limit the pages that recent comment widget must be appeared,then there are no any case to increase your site's loading delay.

...................................................................................................................................

Burn Comment Feed at Feedburner

...................................................................................................................................

Step 1: Login to your Feedburner account.If you don't have feedburner account,just sign up for free account.
Step 2: Type your site's comment feed address inside the Feedburner box.Comment feed address of blogger blogs is similar to one below.

http://MY-BLOG-NAME.blogspot.com/feeds/comments/default

Replace MY-BLOG-NAME  with your blog's correct name.

Burn-Feed

Step 3: Click on Next button and then you will be referred to new page.Now simply type easy and memorable feed title and feed address on the space given.i suggest you to insert same word for feed title and address.

Feed-Title-and-Address

Step 4: Now press Next button.Your feedburner comment feed is live.But we want to make some changes.Therefore click on Next button again.In next page you will see a page similar to one below.Select on two options and click on Next button.


Feed-Stats


Step 5: At last step click on Next button again and you have successfully burnt your comment feed at Feedburner!

.....................................................................................................................................

Create Recent Comments Widget

.....................................................................................................................................

Step 1: Now Click on Publicize button at the top at window. Click on BuzzBoost link in left menu bar.Then click on "Activate" button at the bottom of page.

BuzzBoost-Activation

Step 2: Then fill in the options as shown below.To create a recent comment widget without content,favicon,feed link and author name ..etc,deselect all options.You can set the comments to be displayed on widget by changing the "Number of items to display".If you need links to open in new window,select on "New Window" from the drop down menu.

Feedburner-recent-comments-Settings

Step 3: Finally click on Save button or Activate button and get your HTML code for Feedburner recent comment widget.

Feedburner-Recent-comments-Widget-code

You're already done.You just need to add recent comments widget code on your site.

.....................................................................................................................................

How to Add Recent Comments Widget To Blogger

.....................................................................................................................................


Once you copied the code for recent comments widget,you can follow below few steps to add the widget on your blogger blog.

1: Sign in to your Blogger account.
2: Go to Dashboard >> Layout and click on "Add a Gadget " link.
3: Select on "HTML/JavaScript" page element from pop up window.
4: Paste the Feedburner code that you copied on the space given.
5: Now click on Save button.
6: You're done.

Finally refresh your blog and see the feedburner recent comments widget appearing on the side bar.
How to Add Google News Widget in BlogSpot Blogs

How to Add Google News Widget in BlogSpot Blogs

Google is one of huge companies that provide many different services.All you know about Google News.It is a real time service running by Google inc.Google News display sometimes posts of some websites and blogs.To integrate your website or blog with Google news,The site must be accomplished some requirements such as updating regularly,having informative content etc.Google news generate huge traffic like Google search engine.Everyone prefer to know new things happening around the world.So don't you think that you can attract more visitors to your site by adding Google News Widget ?

Definitely you can catch up further people who like to ascertain news happening in present.Here in this post you will obtain a valuable widget that some bloggers doesn't know.It is Recent Google News Gadget.Below is an example of Google news widget.


Making Google News Providing Blog


Step 1: Sign in to your Blogger account.
Step 2: Now Go to Dashboard >> Layout  and click on "Add a Gadget" link.
Step 3: Select on 'HTML/JavaScript' page element from the pop up window and paste below code on it.

<iframe frameborder="0" width="300" height="250" marginwidth="0" marginheight="0"
src="http://www.google.com/uds/modules/elements/newsshow/iframe.html?topic=h,w,b,n,t&rsz=small&format=300x250">
</iframe>

Step 4: Now save your HTML/JavaScript.

You're done...